


An Installer’s Guide to Wet Underfloor Heating Thermostat Controls
Whether you’re an experienced underfloor heating fitter or just getting to grips with it, one thing you are sure to come across is thermostats. This guide is intended to answer all the important questions you may have regarding underfloor heating thermostats.
- How underfloor heating thermostats work
- How to install underfloor heating thermostats
- How to replace underfloor heating thermostats
- Where to install underfloor heating thermostats
- How to wire underfloor heating thermostats
- Diagram of how to wire underfloor heating thermostats
- How to test underfloor heating thermostats
- How to use and programme underfloor heating thermostats
- How to set underfloor heating thermostats
- How to reset underfloor heating thermostats
How do underfloor heating thermostats work?
A room thermostat works by constantly monitoring the air temperature and switching on the heating when it falls below the temperature that has been set on the thermostat and switching it off once this set temperature has been reached.
For example, if you were to set the temperature of an underfloor heating thermostat to 18℃ and the temperature of the air is 15℃ the thermostat will turn the heating on until the temperature reaches 18℃, then switch it off.
A programmable room thermostat is both a programmer and a room thermostat. This means you can preselect the times you want the heating to be operating and the temperature it should reach during those periods.
For example, you could set a programmable room thermostat to keep the temperature at 15℃ between 9am-5pm on weekdays and set it to 18℃ between 5pm-11pm. A programmer allows you to set ‘On’ and ‘Off’ periods to suit your own lifestyle.
Heating control is a key element of underfloor heating, as it can make all the difference to the efficiency of the system.
As UFH takes a longer time than radiators to heat up and cool down, this needs to be taken into account on the programming of the system.
Ambiente always recommends the use of a 7-day programmable thermostat, to maximise efficiencies and get the best out of your system. There are also upgrade options that enable you to control the system from your smartphone/tablet.
How to install underfloor heating thermostats
Instructions for installing the Ambiente Neostat
Step 1: Remove the screw from the bottom face of the thermostat then carefully separate the front half from the back plate.
Step 2: Place the thermostat front somewhere safe and terminate the thermostat as shown in the wiring diagrams.
Step 3: Screw the thermostat back plate securely into the back box.
Step 4: Clip the front of the thermostat onto the back plate, securing it in place with the retaining screw.
Do: Mount the thermostat at eye level and read the instructions fully so you get the best from our product.
Don’t: Install near to a direct heat source as this will affect functionality, or push hard on the LCD screen as this may cause irreparable damage.
How to replace underfloor heating thermostats
Step 1: Tilt the old thermostat forward and pull it off the back plate.
Step 2: Unscrew the back plate from the back box and remove the wires from their terminals.
Step 3: Take the replacement thermostat and remove the screw from the bottom face of the thermostat then carefully separate the front half from the back plate.
Step 4: Place the thermostat front somewhere safe and terminate the thermostat as shown in the wiring diagrams.
Step 5: Screw the thermostat back plate securely into the back box.
Step 6: Clip the front of the thermostat onto the back plate, securing it in place with the retaining screw.
Where to install underfloor heating thermostats
For underfloor heating systems we recommend the mounting of the wiring centre where it can be easily accessed for maintenance, and near the manifold without impeding access to the manifold and components.
We recommend thermostats are mounted on internal walls at a height of 1.5 metres. They should be mounted away from areas of strong sunlight and also away from sources of heat or draught.
How to wire underfloor heating thermostats
All thermostats will come with full UFH instructions that include wiring diagrams. These will show you how the heating thermostat should be wired.
The wires will be coloured in line with the industry standard, which is:
- White – Connects to the (auxiliary) heat on your system.
- Yellow – Connects to your compressor.
- Green – Connects to the fan.
- Orange – Connects to your heat pump if you have one.
- Red – Can be two separate wires, one is for cool and one is for heat.
- Blue – This is your common or “C” wire.
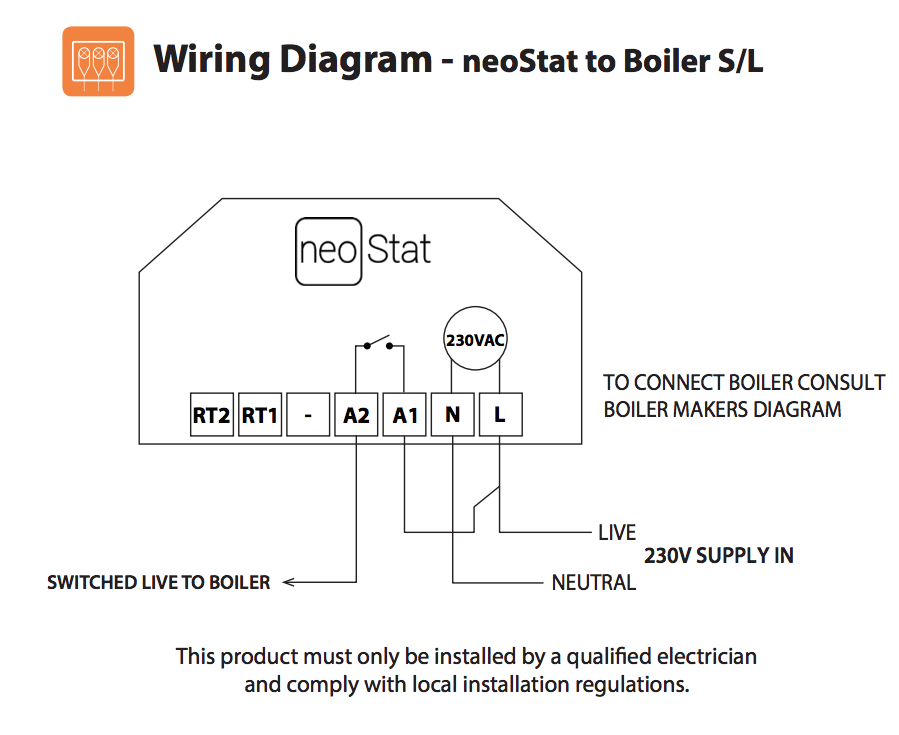
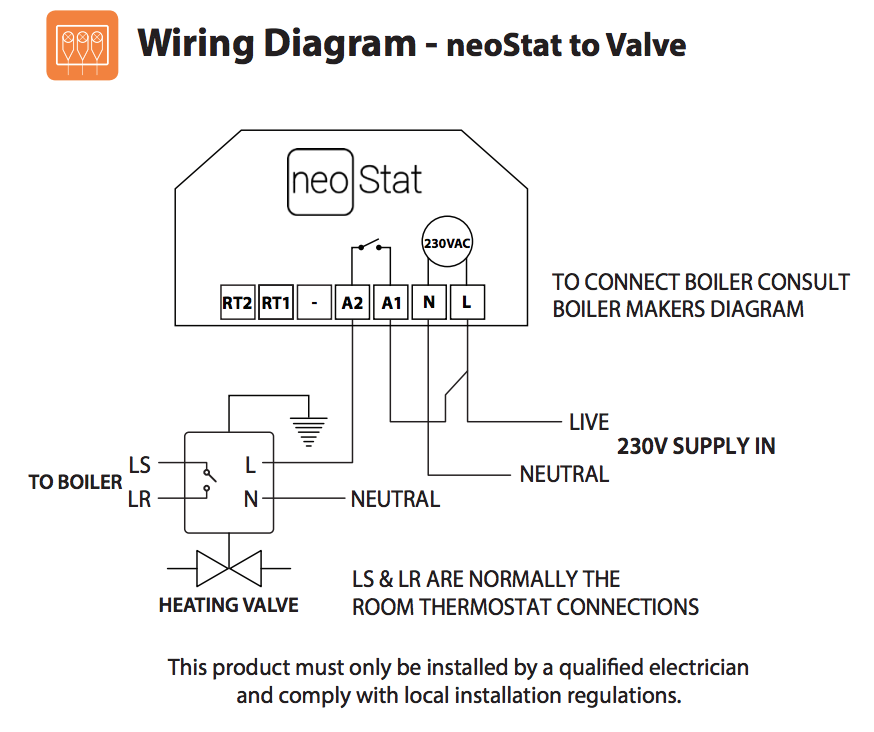
Ambiente NeoStat wiring diagrams:

How to test underfloor heating thermostats
Check that the thermostat hasn’t been set too low, because the heating won’t turn on unless the heating has been set higher than the temperature setting on the thermostat.
How to use and programme underfloor heating thermostats
Using an Ambiente Neostat is extremely straightforward, we have a library of tutorial videos that explain all the different features of the Ambiente Neostat thermostats and how to use them.
How to set underfloor heating thermostats
To set the temperature on the Ambiente Neostat you simply need to use the up and down keys to adjust the set temperature.
When you press either key, you will see the word SET and the desired temperature value. Use the Up / Down keys to adjust the SET value, then press tick to confirm settings and return to the main display.
How to reset underfloor heating thermostats
To reset the Neostat to factory default settings, follow these steps:
Use the Left / Right keys to scroll to SETUP
Press and hold the Tick key for 10 seconds
All of the icons on the display will appear for 2 seconds, then the display will show option 1 or 2.
Use the Left / Right keys to scroll between modes (selection will flash)
Mode 1 = Thermostat. Mode 2 = Time Clock.
Press the Tick key to confirm the selection
The thermostat will then revert to the main display screen for the selected mode.
Check out the video below for a visual reference
If you would like more advice on underfloor heating thermostats, get in touch with Ambiente today.
Did you find this article useful? Check out these posts on take control of your heating and UFH Pricing – How much does wet underfloor heating cost?
This article was written by Robert Tuffin.
Robert is the General Manager at Ambiente and has been working in the underfloor heating industry since 2012.