


Underfloor Heating Manifold Explained
If you’ve installed any wet underfloor heating systems you’ll know that the manifold is the central part. It’s where the pipework from each area converges, and where the supply of hot water from the heat source is fed/blended.
Choosing, installing and maintaining a manifold can be difficult, and there are consequences if you get it wrong, such as cracks and leaks which can lead to an inefficient, underperforming system.
So we’ve put together a guide to provide you with the knowledge and information you need to correctly install wet underfloor heating manifolds. In this guide you’ll learn:
- How a UFH manifold works
- How to choose the right UFH manifold
- Standard UFH manifold dimensions
- Who should install heating manifolds
- How to install a UFH manifold
- How to wire a heating manifold
- How to balance an underfloor heating system
- Where to put the UFH manifold
- Common UFH manifold issues
- How to adjust, bleed and service underfloor heating manifold
How does an underfloor heating manifold work?
Manifolds are used in underfloor heating systems to control the flow of water through the system to provide an even, comfortable warmth across the whole floor. The manifold acts as the hub of a heating system connecting both your supply and return lines in a central place.
A manifold is made up of a flow manifold and a return manifold. The flow manifold features flow meters that clearly indicate the flow rate achieved in each loop.
Each loop on the return bar has a valve to open/close the loop – this is normally controlled by an actuator valve, which responds to the call for heat from a room UFH thermostat.
Choosing the right UFH manifold
Ambiente stainless steel UFH manifolds are designed for use with hydronic underfloor heating systems. They can either be used in conjunction with a pump/blender unit or coupled directly to the centrally blended/pumped heat source.
The UFH manifold is manufactured from pressed stainless steel and is run through stringent testing procedures throughout the manufacturing process. Following completion, every UFH manifold is tested to 6 bar pressure (typical operating pressure would be less than 3 bar).
As standard, the UFH manifold comes with a manual air vent, which can easily be upgraded to an automatic version. A fill/drain point with hose connector is located on both the flow and return bar.

On many underfloor heating systems, the water is pumped and blended locally at the UFH manifold. This is done via a combined pump/blender unit, which is fixed to one end of the heating manifold.
Ambiente offers a unique pump/blender unit, in the form of our CircoMax – which is unique to Ambiente and boasts the following advantages:
+ The pump can be rotated through 90 degrees, resulting in a very slim overall profile, which can fit into a manifold cabinet
+ The unit is easily transferable from one side of the UFH manifold to the other (left or right handed) without the need to adjust or amend the unit
+ It has the latest Grundfos pumping technology in the form of the UPM3 25-70 Auto pump
+ Can pump longer loops than traditional UFH manifold pumpsets
+ Incorporated flow temperature gauge on the flow bar
+ Blender valve has a greater temperature setting range from 25-80 degrees, which is a bonus for commissioning and initial set-up, meaning that systems can be left running at a low flow temperature without threatening sensitive floor coverings.
+ Ambiente also offer heating manifold cabinets to incorporate all UFH manifold sizes
The size and type of UFH manifold required for underfloor heating depends on the project, the number of rooms, flooring and the type of underfloor heating system used will all need to be taken into consideration.
Ambiente can advise the best UFH manifold for your requirements, get in touch by calling 01707 649 118 or emailing info@ambienteufh.co.uk and let us know the details of your project and we’ll recommend the best manifold to use.
Standard UFH manifold dimensions

Underfloor heating manifold diagram

Who should install underfloor heating manifolds?
Only qualified underfloor heating installers and plumbing and heating engineers should install underfloor heating manifolds. If you choose a water-based underfloor heating system, it’s very important that a qualified professional lays the pipes and installs the manifold.
Ambiente works with highly experienced and professional installers, and offer them many key resources to ensure safe and successful installation and commissioning.
How to install a wet underfloor heating manifold
Ambiente manifolds are supplied ready assembled and simply need mounting on brackets prior to installation. Once you’ve laid your cliprails and checked the underfloor heating system plans to see the number and length of each loop required, you can install the manifold.
1. Starting on one side of the manifold, connect to the manifold flow bar. Make a note of which zone the loop serves on the manifold tag supplied.
2. Lay the pipe out, navigating the most efficient route between the manifold and the zone. Start laying the pipe into the cliprail, as per the system designs.
3. On completion of the loop, follow the same route back to the manifold and connect to the return bar (bottom bar with blue caps), making a clear note of the actual loop length installed on the manifold tag.
4. Follow the same procedure for all loops until the area is evenly covered with UFH pipe.
5. Once all loops are installed and connected to the manifold, the system can be pressure tested.
Note that the two manifold bars are offset so that the pipes can pass behind the lower bar for connection to the top bar – we recommend using the top bar as the flow and the bottom bar as the return.
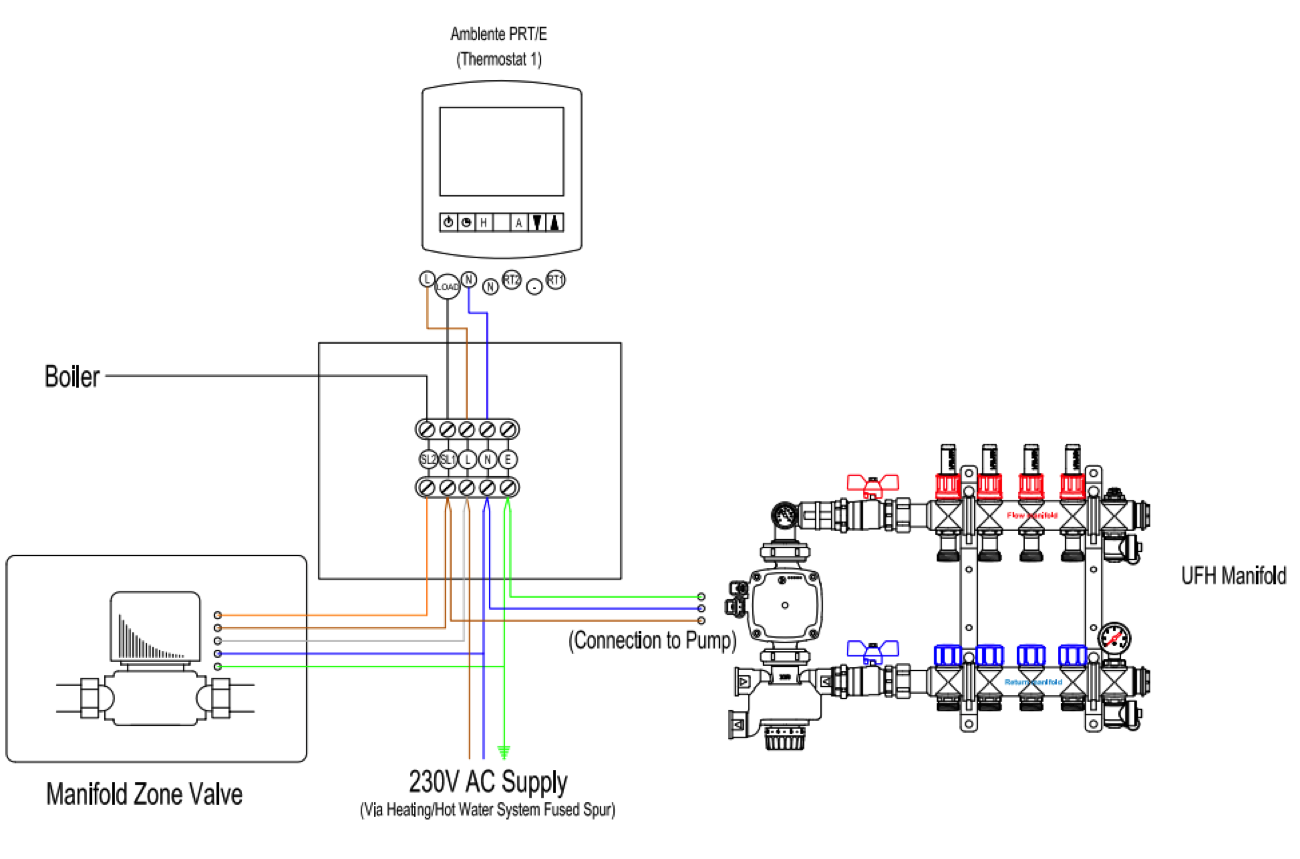
How to wire an underfloor heating manifold
Ambiente provides installers with wiring diagrams which outline how to wire the UFH manifold for the specific system and thermostat that is being used.
Here is an example of the wiring diagram for a Single Zone Manifold with a PRT/E Thermostat.
How to balance underfloor heating
Balance is achieved by adjusting the flow meters to ensure that the flow rates supplied to each zone are at the optimum level to provide an even and comfortable warmth across the whole floor.
Flow rates need to be adjusted to suit the length of pipe in each loop as specified in the pipe layout designs and installation manual. Check out Installer Online’s top tips for installing and balancing underfloor heating systems.
Where should you put the underfloor heating manifold?
UFH Manifolds should be positioned where they are easily accessible to allow for future servicing and commissioning.
We recommend allowing at least 200mm between the finished floor level and the bottom of the manifold, with 75mm clearance above and at least 50mm at either side.
Common problems with underfloor heating manifold
If an underfloor heating system is not working as it should, there are a few common problems that could be the cause. These include:
+ Air in the system. To rectify this, you will need to bleed the air off the system using the air vent on the flow bar of the manifold
+ Incorrect or imbalanced flow rates. These are adjusted using the flow meters on the flow bar. The UFH design will give the correct rates at which these should be set
+ Blockage in the system. If the blockage is caused by a physical item, rather than air, the system will need to be flushed through, to free the debris
How to adjust an underfloor heating manifold
When adjusting the flow rates of an underfloor heating manifold, you will need to adjust the flow meters by turning them to increase or decrease the flow rate.
Each loop on the flow bar has a flow meter, to clearly indicate the flow rate achieved in each loop – these can be used to balance the system at the commissioning stage.
Flow rates need to be adjusted to suit the length of pipe in each loop as specified in the pipe layout designs and installation manual.

How to bleed an underfloor heating manifold
If you suspect that you might need to bleed your underfloor heating system to release the air trapped in the system you will need to check the air vents, adjusting them will enable you to dislodge air.
The Ambiente stainless steel Manifold comes with a manual air vent, which can easily be upgraded to an automatic version. A fill/drain point with hose connector is located on both the flow and return bar.
Filling and flushing the system:
1. Close the isolating ball valves that are connected to the manifold on both bars.
2. Isolate all zones by screwing down the blue caps on the bottom (return) bar and the flow meters on the top (flow) bar.
3. Open the first flow meter (start furthest away from the filling valve) on the top (flow) bar (use the red collar to turn the black section fully anticlockwise, do not use grips – hand tight only). Ensure that all other flow meters are closed, except the loop that you are flushing.
4. Remove the black plastic blanking cap from the filling valve on the top (flow) bar and fit the hose connection/hose which should be connected to the mains water supply. Open the filling valve using the key on the reverse of the drain valve cap.
5. Fix a suitable hose to the drain valve on the bottom bar.
6. Fully loosen the blue protection cap on the bottom bar on the first zone to be filled.
7. Open the tap on the mains water supply and open the drain valve on the bottom bar using the key on the reverse of the blanking cap.
8. Run water through the loop until air is removed from the system, closing down the blue caps on each loop as it is purged.
9. This can now be repeated for each zone by opening the next zone, closing the flushed zone and repeating steps 3-8.
10. At this point the system can be pressure tested if required, by closing the drain valve and unscrewing all the blue protection caps – the pressure should rise slowly – allow it to rise to 4 bar and then close the filling valve and close off the mains water. This should be left for 24 hours to check for any significant drops in pressure.
How to service underfloor heating manifold
To service an underfloor heating manifold you will need to check the system pressure. A guide to pressure testing can be found in Ambiente’s installation guides.
You need to check the pumps work, check the system interlock, check each zone switches on, check the controls are set up correctly, look for leaks and bleed the system.
UFH manifolds should only be installed by qualified underfloor heating fitters and plumbing and heating engineers. Ambiente can provide installers with all of the documentation, installation guides, Underfloor heating wiring diagrams and technical support needed for a perfect underfloor heating installation.
Get in touch with Ambiente today to request a quote!
Did you find this article useful? Check out these posts on An installer’s guide to underfloor heating thermostat controls and what should you consider before installing ‘retro-fit’ underfloor heating?
This article was written by Robert Tuffin.
Robert is the General Manager at Ambiente and has been working in the underfloor heating industry since 2012.